
Using SpywareGuard to protect your computer from Spyware & Hijackers
Lawrence Abrams
- April 8, 2004
- Read 88,011 times
Introduction
While you use anti-virus software to protect your computer against known viruses, trojans, and worms, you most likely do not use a piece of software to protect your computer against Spyware and Hijackers. That is where SpywareGuard comes in to play. SpywareGuard is a Freeware program by Javacool Software that will run alongside your traditional virus scan, but instead of alerting you when you are about to run a program infected with a virus, it instead tells you when you are about to run a Spyware/Hijacker. Though products like these are not mainstream like anti-virus software, these products are becoming essential for keeping your computer secure and clean from harmful software.
Configuring SpywareGuard to run on your computer
Step 1: Download the Software
You can download the software here: SpywareGuard
Your first step should be to download the SpywareGuard software from Javacool's web site. Save the downloaded file to a location that you will be able to find later. Once the file is downloaded, you should navigate to the location where you saved it using Windows Explorer or My Computer. Once at that location, double click on the SpywareGuard install program to install the program to your hard drive. Let SpywareGuard install to its default location and when it is done it will ask if you would like to start SpywareGuard. At this point you should put a checkmark in the box so that it starts SpywareGuard after the installation is complete. You will then be presented with a screen similar to Figure 1 below.
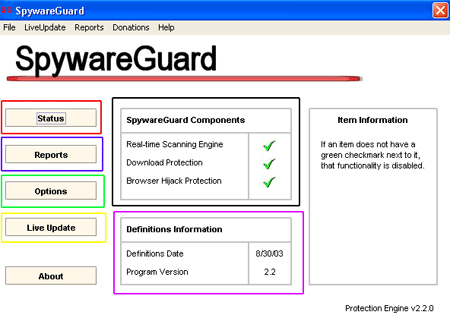
Figure 1. Status Screen for SpywareGuard
For this tutorial I have broken the status screen into 5 parts, each designated by a different colored box.
A summary of each section is as follows:
Status - This button, designated by the red box is the first screen that you will automatically see when starting SpywareGuard and can be used to see the status of how SpywareGuard is protecting your computer and date of the latest Spyware/Hijacker definitions.
Reports - This button, designated by the blue box, will bring you to the report screen that shows a listing of any Spyware/Hijackers that SpywareGuard has found in the past. This will be discussed in greater detail further into the tutorial.
Options - This button, designated by the green box, will bring you to the options setup for the program. This section allows you to configure SpywareGuard as to how it will protect you and notify. You can also change any connection information in this screen if your programs require a proxy server or specific instructions when using the Internet.
Liveupdate - This button, designated by the yellow box, is used to update the definition files on your computer. It is imperative that you periodically update SpywareGuard using this button to assure that you have the latest protection against known Hijackers/Spywares.
SpywareGuard Components - This status area, designated by the black box, tells you the current status of the various SpywareGuard protection components. If there is a checkmark next to the item that means that the particular protection is running.
The various components are described as follows:
- Real-time Scanning Engine
- This component will scan every .exe and .cab file before it is open and executed. If the scan shows that the piece of software you are about to open is a known Spyware/Hijacker, an alert will pop up notifying you of this and asking if you would still like to execute the software.
- Download Protection
- When this option is running, SpywareGuard will block known Spyware/Hijackers from being downloaded using Internet Explorer.
- Browser Hijacking Protection7
- This component will alert you to any known methods of Browser Hijacking that are occurring on your computer. These entail software that adds Browser Helper Objects or changes to settings in your Internet Explorer. When this occurs an alert will appear notifying the user and giving the user a chance to accept the changes or revert back to what they were previously.
Definition Information - This section, designated by the purple box, displays the date of the Spyware/Hijacker definitions you are using with SpywareGuard and the version of the program
Step 2: Updating SpywareGuard
The next step that should immediately be done is to update SpywareGuard so it is using the updates. You do this by clicking on the Live Update button as shown in Figure 1 above. This will present you with a screen similar to Figure 2 below.
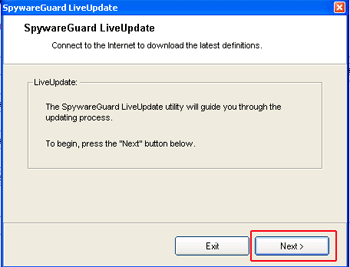
Figure 2: SpywareGuard Live Update Screen
You should now click on the next button and SpywareGuard will connect to the Javacool servers to see if there are any new updates to be downloaded for the program. If there are new updates it will notify you as shown in Figure 3 below. The section designated by the blue box in Figure 3 will display the date of the definitions file and whether or not the update was installed successfully. You should then click on the Exit button which will bring you back to the status screen.
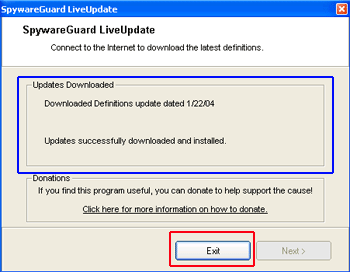
Figure 3: Update Found for SpywareGuard
If no update is available a screen will notify you of this. You should then click on the Exit button to go back to the status screen.
Step 3: Set SpywareGuard Options
The next step is to make sure that the appropriate options are set for using SpywareGuard. You should click on the options button as seen in Figure 1. This will bring you to a screen similar to Figure 4 below.
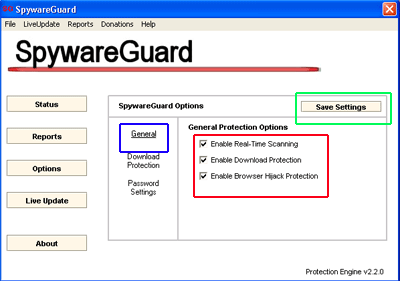
Figure 4: SpywareGuard General Options
In the General Section of the options, you should make sure you have a check mark in all of the General Protection Options as seen above in Figure 4. When you have these options set as shown above, you should then click on the "Download Protection" button. This will bring up a screen similar to Figure 5 below.
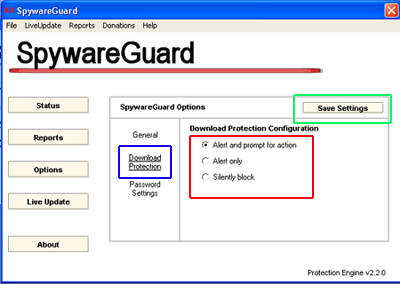
Figure 5. SpywareGuard Download Protection Options
In the Download Protection options screen, make you sure you have the radio dial selected that is labeled "Alert and prompt for action". When that is done, click on the "Save Settings" button. This will bring you back to the main status screen. You should now click on the X at the top right of window to minimize SpywareGuard.
NOTE: You should never close SpywareGuard using File and then Exit as this will shutdown the program completely. Always just minimize the window by clicking on the X in the upper right hand corner.
If you have followed all these steps, SpywareGuard will now be configured to protect your computer against Spyware and Hijackers. SpywareGuard will automatically start when you boot your computer, so you do not have to worry about starting it every time you reboot. You will know that SG is started and running when you see an SG icon running in your system tray, designated by the red box as shown in Figure 6 below.
![]()
Figure 6: SpywareGuard System Tray Icon
SpywareGuard in Action
When SpywareGuard is started and running it will constantly scan executables, cabs, and downloaded files so that you do not install a known Spyware/Hijacker without SpywareGuard warning you first. If you attempt to install one of these types of programs, SpywareGuard will present an alert similar to Figure 7 below.
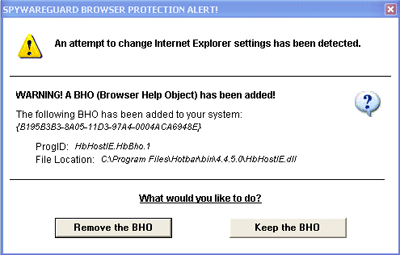
Figure 7: Spyware/Hijacker was Found
This alert will give you the option of allowing the particular piece of software to be left installed or to be removed. If you do not want the software to be installed, you should click on the Remove button, otherwise click on the Keep button.
To see a list of Spyware/Hijackers that SpywareGuard has seen in the past, you can look in the report screen of SpywareGuard. Double click on the SG icon in your system tray, and that will open up the status screen as shown in Figure 1. You should then click on Reports, and you will see a listing of attempted Spyware/Hijacker installations that occurred in the past. The screen will look similar to Figure 8 below.
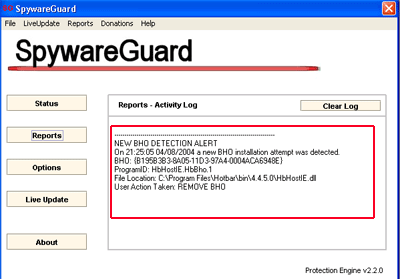
Figure 8: SpywareGuard Report Screen
The area, that I designated with the red box, will show listings of attempted installations of Spyware/Hijackers. You can read through this list to see the details of what was attempted, and clear the log if you wish. When you are done viewing the log, click on the X in the upper right hand corner.
Conclusion
As you can see SpywareGuard runs in a similar manner as any anti-virus software. It runs quietly in the background until a threat to your computer is assessed and then warns you of this threat. SpywareGuard should be a program that is definitely installed on your computer in order to keep it running safe and efficiently. I would not be surprised if much of the functionality of programs like SpywareGuard will be bundled directly into your anti-virus software in the future, but for now that software is more than adequate to the task.
As always if you have any comments, questions or suggestions about this tutorial please do not hesitate to tell us in the computer help forums.
--
Lawrence Abrams
Bleeping Computer Internet Security and Spyware Removal Series
BleepingComputer.com: Computer Support & Tutorials for the beginning computer user.